Showing posts with label Thrifty Tips. Show all posts

Tuesday, January 22, 2013

Homemade Peppermint Mocha Syrup

Peppermint Mocha seems to be THE flavor this winter. And for good reason, too; it's yummy! I was seriously mourning when the last of my half pound of peppermint mocha coffee dribbled into my mug last week. It had been a gift and I'm just too cheap thrifty to buy more. What's a Mama to do? After a couple days of bumming, I came up with a solution. I made my own syrup to flavor coffee, hot chocolate and even milk. Peppermint Mocha Syrup is soooo good and easy to make.

Peppermint Mocha Syrup
1 Cup of cocoa powder
1 C. sugar
2 C. brewed coffee (I used decaf)
4 candy canes, crushed

In a medium sauce pan combine all ingredients with a whisk over medium-high heat. 
Stir occasionally until it comes to a boil. Turn down heat and let simmer until all of the candy pieces have dissolved. Store in the fridge until needed!

See, simple to make and great to enjoy. It would also be great over ice cream or in milk shakes. Hope you like this and have a great day!

Many Blessings,
Kelly

Sunday, January 20, 2013

Crocheted Hats & Headbands: Where Form Meets Function

Since taking up crocheting again, I've been able to create quite a few things. I have felt truly blessed to be able to make items for myself, our home and others. Items that would cost more than what I can make them for. Now, I am not going to be doing any tutorials on crocheting, especially when I can really only do single crochet and had to figure out my own way to make flowers! If you are interested in crocheting, there are many tutorials on You Tube, or you can go to TipNut.com for resources and patterns.
This is a hat that I made for Princess. It's a bit shorter because it's more about style than warmth!

A very reluctant model!

This is my hat. I loved this yarn when I saw it into Walmart. It may be hard to tell in the picture, but it is pink camouflage, SO me!

This is my headband with a flower. I made it so that you can button the flowers on or leave them off.
 I was trying to think of more ways to use my fave yarn and make something practical. I thought of headbands! Now, I was pretty happy to make these for a couple of reasons.
The first is that I have been wearing my hair the same way for quite a while. I'm in a rut. This is a way to change it up. Plus these headbands don't give me a headache like other's can. 

The same headband without the flower.
The other reason I like the crocheted headbands is for my daughter. About a month and a half ago she decided that she wanted me to cut bangs in her hair. After asking many times if she was absolutely sure and going over what it would involve for bangs to look the way she wanted (she has curly hair and it would require blow-drying for her bangs to be straight), I cut them. 15 minutes later she bawled for half an hour and has only worn her bangs down maybe 2 or 3 times. 
So she has been wearing those plastic or cloth covered headbands. The only problem is that she is ALWAYS yanking them down her forehead and then dragging them back up. Then her forehead, and sometimes nose, are bright red from being scraped and she is breaking out. 
Enter the crocheted headbands! They stay in place better than the others, they button so that they can be removed with out having to touch her forehead and even if she does yank them down, it's not the same as the others scraping her up.
The headbands only take about 30-45 minutes to make depending on how wide you want them and how many flowers you make, so you can make quite a few in a short amount of time. Very nice, especially for those instant gratification crafters such as myself! My next goal is to learn how to crochet hearts to put on the headbands and other things. 

Have a lovely day!
Many Blessings,
Kelly

Thrifty Thursday: Recycling Last Year's Calendar


Due to technical difficulties, this is very late in posting!


I know this is a bit late, considering that this is the 10th of January, but don't they say "Better late then never."?

These days, calendars can be expensive. Yes, some businesses and organizations give out free ones and if you are lucky, you just might like the free one! Or you might find that you hate to toss last years calendar just because the year has changed. That was the case for me. Last year's calendar had handy pockets and it fit in just the right spot on the fridge. I really didn't want to get rid of it, and I like the art work, too. So I decided to give it a face lift for 2013.


Last year's calendar. Love the illustrations on the pocket at the bottom!

Blank calendar page that I made using Microsoft Word. I printed the calendars
out on card stock, both for durability and so that last year's calendar wouldn't
show through.

Using double stick tape on the corners, I carefully lined up the new page and VOILA!!!! 2013 rolls in all thrifty and good looking!

Have a great day, Friends!
Many Blessings,
Kelly

Saturday, December 15, 2012

Thrifty Thursday: Christmas Decor & More!

I know it's Friday! I meant to write this yesterday, but my trip into town lasted much longer than I had planned, so I ran out of time. It's been a while since I have done a "Thrifty Thursday" post, not for lack of things to share though! I just don't know how these ladies that blog daily have the time on top of everything else!

Anywho, I thought I would share a few tips for Christmas decor and my latest sewing project that will help with both our budget and our goal to be better stewards of this planet.
TAA DAAAA! Cloth "paper" towels! I've seen this idea before online, but the last time I saw it was a post that was linked up to Homestead Revival's Barn Hop. So Saturday I used the last of the paper towels, and thought that I hated to have to buy more. We're rather crunched for money this month and I'm cutting as many things from our budget as I can. So I looked at my dear hubby and said "What would you think of using cloth paper towels? I'm pretty sure I have all the material I need to make them." He thought for a moment and, to my surprise and joy, answered, "Sure. Can we keep a roll of regular paper towels for in case the cats get sick, though?" I agreed that that was a good idea, but they have to stay under the kitchen sink. And then I got busy hunting down some terry cloth I was pretty sure I had squirreled away.

Now, the terry cloth is not my choice of colors, but it was what I have, and I have YARDS of it! I decided to make some Christmas ones because I also have about 3 yards of that as well from years ago. I used the tutorial from My Healthy Green Family. I didn't do snaps, nor do I plan to. I just re purposed a small basket to hold them and set it right where the paper towel holder sat on the counter.

 If you are wiping up something that might stain and you want to keep them looking as nice as possible, rinse them in cool water immediately! Our first major spill was pizza sauce, and I figured that I'd have a stained one, but after wiping up the initial mess, I rinsed it out will cool water to finish cleaning up and there was hardly any discoloration. I was also surprised at the whole incident because it was Wheels that spilled the sauce and as he reached for a paper towel and realized it was a cloth one, I thought he'd sputter about it, but he just went with it without a complaint. I think it helps that they are on the same spot as the paper ones! Now I just need to make a wet bag for the dirties!

Here is another thrifty tip; tie your cupboards shut so your hubby and kiddos can't get to the food!!! Just kidding! This is a bow on the cabinet door that I made from some homespun fabric. This was a curtain that I had made years ago and haven't used in a long time, so I just cut a little notch and tore the hems off, then continued to tear strips off of. I've always wanted to do the bows on the cabinet doors, but have always been too cheap thrifty to buy the amount of ribbon I would need. Even if I hadn't re purposed this material and had bought it new, 1 yard would have cost less than a spool of ribbon and have been more than enough to do the job!

All of the cupboards along one wall. I think it looks so pretty and festive!

A bow in the middle of my DIY lighted garland in the living room. Our living room, dining room and kitchen are all open to one another, so using the same material through each "room" helps tie things together.


I used another strip of cloth around my canning jar caddy, which is also my utensil caddy. You can use what you have to add some festive flare to your home, too! The cream colored bowl is the usual bowl I use to hold our fresh fruit in, but I put it on top of the red cake stand to add some zip. And the egg basket is in it's usual place on the counter. I had the food processor on the counter, but decided to move it to clear some of the counter.

This isn't the best picture thanks to the glare, but this is a Christmas hymn/carol subway art. I've seen some on Pinterest, and there are some free printable ones, but I wanted to make my own. I used the Word Art in Microsoft Works on my laptop and added a bit of clip art as well. I printed it on some off white card stock. I made 2 subway art prints for our bedroom with the names of Jesus. They came out beautiful, if I may say so myself. And I made yet one more, in the living room.

The dinner menu board even got a Christmas makeover! This is just some computer paper I have. I was going to do a subway art print with all of the Christmas goodies we like and I make, but I didn't want to spend the time. And believe me, you can waste spend lots of time on this project. Of course, it wasn't until after I made the prints that I thought to look up free fonts in Pinterest. And I found many, but then I hit the mother load! Dafont.com has TONS of free fonts!! I even found fonts that look like the writing in The Hobbit and The Lord of the Ring series!! My geeky heart swelled with joy at the thought of making my own nerd subway art. (I totally admit to being a huge fan of the Tolkien books and movies. I even named one of our chickens Arwen and I dressed up as Frodo this past Halloween for the kids Book Character Parade at school. Never would have figured me for suck a wacko, huh?)

I hope this gives you some ideas!

Many Blessings,
Kelly


Thursday, October 25, 2012

Homemade All Natural Facial Wipes


Yes, I'm still here and kickin'! It's just been that I've either been too busy doing to take the time to write, or I just haven't had enough brain power to write a coherent post. There's been a whole lot of apple picking, applesauce making, batch cooking, crock-pot freezer meal making, sewing and lots of other projects going on.

The other day I was on Pinterest and one of the people that I follow had pinned homemade boogie wipes. Now, my kiddos are a bit too old for boogie wipes, but my nearly 3 year old niece was a perfect candidate for them, and I just so happened to have the ingredients* and other items needed. Her mother was very pleased with them, and so was her poor little nose! It got me to thinking about what other types of "wipes" I could make from flannel material. And then I had an AH HA moment!

Now, I wear make up nearly every day. And I have never been able to get into the habit of washing my face at night. By the time I've gotten the kiddos to bed and it's time for me to turn in, I'm toast and so is my body, especially my back. The thought of huddling over the bathroom sink to wash my face (and get my front side soaking wet in the process- it never fails!) is just not as appealing as heading right to my bed and my secret stash of York Peppermint Patty Pieces. And I know that there are commercially made wipes out in the store, but I have almost entirely eliminated chemicals from my personal grooming. AND I want to stick to our budget. BUT I don't want to keep scaring my hubby and children every morning by stumbling out of the bedroom with a bad case of bed head, white drool marks on my face and raccoon eyes. I can at least get rid of the raccoon eyes!

So here is my budget, health and planet friendly solution! Homemade facial wipes. Before I give the "recipe" I want to say that you may need to adjust to your own skin. I have very oily skin, wear liquid eyeliner, mascara, homemade blush, homemade foundation powder and a touch of concealer under my eyes. I have found that by holding the wipe on my closed eye lids for a few seconds helps to loosen the eye makeup so that I am not wiping too much on such a delicate area of the face. These do a remarkable job of removing nearly all traces of eye makeup and my skin feels clean, refreshed and moisturized.

~Homemade Natural Facial Wipes~
 
~Container to store your wipes
~Flannel material cut into squares, as many as will fit folded neatly
and to the size you prefer.
~About 1 C. of hot water (you could use distilled if you want, I just used tap)
~about 1/4 C. of witch hazel
~about 2 Tbsp. of glycerin
~about 2 tsp. of almond oil
 
Cut your flannel into squares of the size you feel most comfortable with. Mine are about 12 x 12. You could use an old flannel sheet or shirt. I happened to have a fabric remnant that I picked up at Walmart and thought the dark brown would be best because of my eye makeup.You can also hem these, or just run a stitch aroung the edge. I was lazy and just used my pinking shears to cut them. Fold your squares and place in a container with a lid, I used a plastic wipes container that was lurking in my bathroom cupboard. Then heat your water until hot, then add the other ingredients and stir well to break up the oil. Pour over the flannel squares and carefully "smoosh" them down. You could let them sit for a minute or 2, close the lid of your container and then flip it over to help distribute the fluid. If they seem too dry, add a bit more hot water until they are all moist, but not dripping wet. Use as needed to remove the daily dirt and makeup!


You could add essential oils if you prefer a scent or want the added benefits, but I like the plain smell of witch hazel. Glycerin is a gentle cleanser and a humectant, which means it draws moisture to your skin. The almond oil will also help in cleansing and moisturizing the skin, I don't feel the need to moisturize after using these, but if you have very dry skin, you can, or you could try upping the quantity of glycerin and almond oil. I just throw my used wipes into the laundry with our towels and wash them. Then I set them aside until I have them all and make another batch of the solution.
 
*For the homemade boogie wipes I mentioned above, I didn't have aloe vera gel as the recipe calls for, so I used glycerin instead. And I had grabbed the eucalyptus essential oil instead of the lavender, not realizing my mistake until after I had added a drop to the solution. I liked the results of using the eucalyptus instead of the lavender, though, it gave the boogie wipes a Vick-sy smell. Just be careful when using eucalyptus oil on the skin, I wouldn't use more than 1 drop when making these boogie wipes. I had more flannel squares than would fit in the box for my niece, so I stuck them in a baggie for my cold and cough kit in case some one does have a sore nose in the house this winter!
 
If you decide to try the facial wipes, I'd love to hear from you! Well, even if you don't want to try them, I'd still love to hear from you! You can comment at the end of the blog post, or you can "like" Homespun Inspirations over on face book.
 
Have a wonderful autumn day, Friends!
 
Many Blessings,
Kelly


Saturday, April 21, 2012

Thrifty Thursday #4: Scratch Recipes & Homemade Snack Bags

Hey Friends! Having a good week? I've been working on getting caught up with house work in the mornings, and relaxing with the kids in the afternoon. Unfortunately I'm in pain again, and I'm completely caught off guard. I'm taking the day "off" today, but will get back to work tomorrow.

So, last week I presented some recipes and sort-of challenge to bake and make from scratch. Since then I've been searching on line to find a homemade alternative to Bisquick. There are some recipes that I really like that used it, but I don't want to buy it. This is one of the few things that I've missed from my pared down grocery list! I found some recipes, but I haven't made any yet. The one recipe I trust most is from King Arthur flour. My biggest hesitation is that it calls for shortening, which I really don't want to use anymore. I have about half a can of butter flavored Crisco that once it is gone, will not be replaced. I've only been using it to grease my baking pans. I'm thinking of substituing the shortening with coconut oil. Any other suggestions are very welcome!
King Arthur Quick Mix

Alright, on to some of my recipes. Most of my recipes are from an old copy of the Betty Crocker Cook Book that my mother in law gave to me. My Mom has a copy of this, as well, and was the cook book that we always used when I was growing up.  It's the first one I go to when llokng for a recipe. I've just tweaked many of them to my specifications!

~Basic Sweet Muffin~
1 egg
1/2 C. milk
1/4 C. oil
1/2 C. sugar
2 tsp. baking powder
1 1/2 C. flour
1/2 tsp. salt

Beat egg, then mix milk and oil. Add dry ingredients and mix until just blended. Bake at 400* for 15 minutes. This makes 1 dozen standard size muffins.
I use only about 1/8 C. of olive oil and use 1/8 C. of unsweetened appla sauce. I also add 1 tsp. of vanilla. You can substitute 1/2 C. of all purpose flour for whole wheat flour. I usaully add chocolate chips for the kiddos. If you add about another 2-3 Tbsp. of milk, chocolate chips and pour the batter into a greased 8x8 square pan for chocolate chip bread. Bake at 350* until a toothpick come out clean from the center, about 25-30 minutes. Double the recipe and bake it in a 13x9 pan for a weeks worth of breakfasts!


~Golden Layer Cake~
2 1/4 C. flour
1 1/2 C. sugar
3 tsp. baking powder
1 tsp. salt
1/2 shortening**
1C. milk
1 1/2 tsp. vanilla
2 eggs

Pre-heat oven at 350*. Grease pans. Measure ingredients into a large mixing bowl. Blend for 30 seconds on low, scraping bowl constantly. Beat for 3 minutes on high , scraping occasionally. Bake until toothpick comes out clean in the middle. Makes a 13x9 cake or 2 8"/9" layers.
**recipe calls for shortening, but I felt it was too dry and I don't want to use Crisco anymore, so I use olive oil. The cake is wonderfully moist now!
~I have a child that will only eat chocolate cake, but loves cinnamon. I added about 1 tsp. of cinnamon to the batter, and he loves it! If you don't have ingrdients for frosting (like me this past Wednesday!) add chocolate chips to make a snack cake. Very yummy!


~Black Midnight Cake~
2 1/4C. flour
1 2/3 C. sugar
2/3 C. unsweetened cocoa powder
1 1/4 tsp. baking soda
1 tsp. salt
1/4 tsp. baking powder
1 1/4 C. water
3/4 C. shortening**
2 eggs
1 tsp. vanilla

see instructions for Golden Layer cake above.


I have not tried to substitute unsweetened applesauce for the shortening/oil yet. I did try to substitute some of the flour in the Black Midnight cake with whole wheat flour with dissapointing results, but it was before I started using olive oil. I just haven't had the nerve to try again! I hope you try out these recipes. If you do, let me know, I'd love to hear how they worked for you!

And now, something I've been so excited to show you! Say hello to my reusable snack bags!!!!
Three large, two medium and four small snack bags.

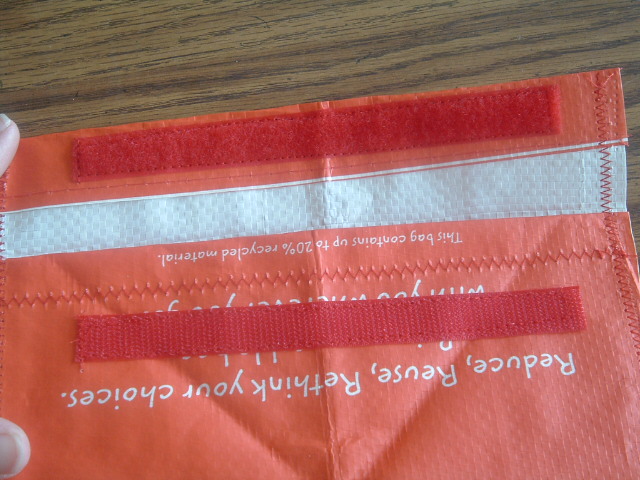
I used sew-on velcro for the large and medium sized bags. These will hold pretzelsor crakcers.

I used sticky backed Velcro on the small snack bags, which are lined. These are for cookies/cookie bars.

 
From just one 99cents reusable shopping bag, I made 9 reusable snack bags for my Dear Hubby and kiddos to use for their lunches! How cool and thrifty is that?!?!? I got the wonderful idea from, of course, Pinterest. There were lots of pins of cloth snack bags using ripstop nylon, but I didn't really want have to search or pay for it. And then I found a pin using reusable shopping bags. I will go into detail on how to make these in a future post. But they are super easy to make.
 
Well, that's all for this week! Hope you hve a lovely rest of your day.
Blessings,
Kelly

Wednesday, April 18, 2012

Reusable Shopping Bag Fun #1

I think I have a problem. It's name is Pinterest! Oh how I love it and hate it at the same time. I could spend hours (and o.k., I have!) perusing the boards, pinning my little heart out. Learning how to grow potatoes in landscaping fabric bags, make a fairy garden and whip up a cocktail dress from a reusable shopping bag! Alright, maybe not a cocktail dress (I'm not the cocktail type, more of a maple kefir or herbal tea type. No fancy duds required.), but many cute things! And, I have made some! I have seam ripped, cut and sewn 2 reusable shopping bags into some very cute and practical things. Some of them need to wait for their unveiling tomorrow, but for now I give you........


A purse set! Complete with wallet, change purse and another little pouch. This is from just one shopping bag. And I still have a panel of the bag left, which I'm going to use to make a Bible cover. Here is what the shopping bag looked like before:


This bag is just so beautiful, I wasn't sure what I wanted to do with it! After my Mom saw my first project, she brought this up to me. (And then proceeded to buy me 2 more shopping bags from T.J. Maxx! Gotta love your Mom!) I considered making a lunch bag/snack bag set for myself, but I already have a lunch bag. And this is just too pretty for occasional use. So, I made the purse set.

I used the seam ripper to take the binding and handles off of the bag because I planned on using them. You can just cut it apart, though if you want. The shopping bags are really easy to work with in terms of the fact that you don't need to hem for fear of fraying. Depending on what you are making, you don't need to hem. I chose to use the binding for a neater look, and I think it made it easier to sew. The only thing I would recommend is to use a needle designed for sewing heavy materials.

So, there you have it! My newest obsession, via Pinterest: making super cute things out of reusable shopping bags. And I'm just getting started!

Blessings,
Kelly

Thursday, April 12, 2012

Thrifty Thursday #3: Scratch That Off Your List!


Could you tell I was working hard on that title?

Hello, Friends! I know it's been a while, but, as usual, I've just been too plumb busy or tuckered out to compose a coherent post. Believe me, it's better that way. I ramble enough as it is with out me rushing or being semi-conscious during blogging!

So, it is another Thrifty Thursday, and today I'm getting out from behind the sewing machine and into the kitchen. One of the best (and tastiest!) ways to save money is to make your own baked goods from scratch. This is also the healthiest way to enjoy your cakes, cookies, muffins and other treats. Now, I know that for somethings, it may seem cheaper to buy some items ready made, or even from a mix. In the long run, though, I think that once you get into the habit of making things from scratch everything will even out. And you might find that you can give up some things because you have replaced it with something homemade.

Now, if you have been reading my blog for a length of time, you know that I bake just about every Saturday. Sometimes I only get to make the kiddo's breakfast item and snack item, but that is a huge help. I like to do a majority of my baking on one day because I do not like firing up the oven for only one thing. This way I can run my oven all at once and bake more than one thing at a time. This saves money by conserving electricity.

I think I'm going to revert to my bullet structure here, cause I can sense some rambling and backing up in the near future!

  • Baking from scratch saves money because you are buying 1 ingredient with multiple uses. Yes, you may be able to buy a chocolate cake mix for around a $1 a box, but if you buy a can of baking cocoa for about $2.75 you can make a chocolate cake, chocolate zucchini bread, hot chocolate (made with actual milk, not boiling water!) and chocolate syrup for ice cream or chocolate milk. Talk about more bang for your buck!
  • Baking from scratch gives you more versatility and can be adjusted to your family's preferences. You could buy a loaf of bread for sandwhiches and then a bag of rolls for dinner. But if you make a batch of bread dough, you can have both!  Or, maybe Timmy likes plain chocolate chip cookies but Betty Sue like walnuts in hers. You can make one batch of cookie dough and split it in half for them both to take to school with their lunches.
  • Baking from scratch is healthier. YOU control what you put into your food. You can add whole wheat flour to your cookies, substitute some of your butter or oil with unsweetened applesauce, and eliminate corn syrup, food dyes, additives and preservatives.
Now, I could go on. (And you know how I can go on!) But I have the feeling that you can all get my point. If you are not use to baking and don't have baking materials, or you really want to embrace making more things from scratch, you may need to invest in some things. You will find that investing is and will be a recurring theme in these posts. You may cringe at the price of a rolling pin, but that is really a one time purchase, whereas refrigerated ready made pie crusts are only good for one or two pies. That rolling pin will make you pies for practically your entire life time, and maybe even your daughter's lifetime. That is an investment worth making and money well spent!

Before I get to the recipes, I would like to tell you about some of the items I have in my kitchen that I find invaluable to have. I am by no means Julia Child or the Cake Boss, so don't feel that you have to have them, or even agree with me! And by all means, if you have something you would like to share, I'd love to know about it!
  • Large Pyrex mixing bowls: I have 2 large and one really big one. And every Saturday all 3 of them get used at least once, if not more! I like Pyrex (or Anchor Hocking) because they are sturdy, easy to clean, and you can mix and bake in them.
  • standard size muffin pan: good for (obviously!) muffins, cupcakes, mini meat loafs, stuffin' muffins and cloverleaf yeast rolls. My pan has a dozen cavities, so my basic muffin recipe can be made in one batch.
  • 2 to 3 bread loaf pans: or even more! I like to make quick breads and yeast breads, and if you are inclined to make homemade bread for your family's weekly supply, it is a very sound investment. And they can stack together so that they don't take up much space.
  • a 13x9 oblong pan: I have 2 Pyrex, and 3 metal ones. And I have used each and every one on certain Saturdays. I make the kiddo's breakfast cookies, cakes, casseroles and brownies in them. And all but one of the Pyrex pans have lids, so I can store in them as well. Now, this may be a lot for some people, but I also make snack for our church refreshments on a regular basis, as well as making birthday cakes for my DH and children. I can make the cake for our family party, the children's friends party and the goody to bring in to school to share for a treat. These pans to not sit in the cupboard in neglect!
  • a glass 4 cup measuring cup: This, too, is a recent purchase. I wondered if I really would use it as I stood looking over the Pyrex/Anchor Hocking shelves at my local Kmart, $1 off coupon in hand. But, like the sheet pans, I do. I use it for measuring and mixing my wet ingredients for homemade bread and other recipes. And I have even used it for the DH's and mine scrambled eggs.
  • a glass 8 cup (2 qt.) measuring cup: I have a Tupperware version of this that I used for about 7 years before I started to become a bit leery at the thought of there being Tupperware scrapings in my muffins, pancakes and waffles. Then I purchased an Anchor Hocking one and gave the Tupperware one to Hubby for a sap dipper. This is the perfect size for a batch of muffins, chocolate chip bread, or homemade waffles. It is also used for pouring off the juices of a turkey or when straining homemade stock.
  • rubber or silicone spatulas: I have 4 of these. One is a very large one from Tupperware that I use for mixing up snack mix, granola or sauteing with. It doesn't really get the job done when it comes to scraping the sides of mixing bowls, so that is where 2 others come in. And then there is the double ended one that is more narrow for scooping out of jars with. You will never waste a drop when using one of these, and scraping the bowl clean is handy when it's time for clean up.
I'm pretty sure I'm missing a dozen things, but those can be for another post. It's time to get onto the fun part: recipes! I have posted these recipes before, so I will only be adding the links, but I'll be giving some hints and tips for each. And as I'm writing this, I'm thinking that this is going to be part one of a series because I have so many more basic recipes to share!

Boynton Breakfast Cookie Bars I make these just about every week for my kiddos! You can add what ever stir-ins that you and your family like. These have replaced the white bread toast and cheerios that the kids used to eat for about 2 1/2 years now. I would really like to figure out how to soak the oatmeal for this recipe, but just haven't had the time to experiment. If I figure it out, I'll be letting you know!
Chocolate Zucchini Bread While going over this post, I realized that I didn't include the sugar!! I feel like such a big goober. If you tried to make this, I SOOOO apologize! The sugar is now included in the recipe. Another note on this is that I no longer use canola or vegetable oil, I use olive oil. This is great for a snack or for breakfast. It's yummy with cream cheese, too! I use my food processor to shred the zukes, and take out the big seeds. I'm going to have to make a batch of this Saturday, I froze shredded zucchini for this purpose!
Whole Grain Chocolate Chip Cookies I make these every week for the kids to put in their lunch boxes. I have taken to making these in the sheet cake pan and substituting 1/2 to 1/3 cup of the butter to unsweetened applesauce. I also do not use margarine or shortening any more. You could use coconut oil in place of butter, too. This recipe is really just your basic chocolate chip cookie recipe that I tweaked. If you don't have oat and wheat flour, you can use all purpose flour. By using the sheet cake pan I can save time and I have enough for the entire week for both the kids and my DH. (O.k., o.k., and I can filch a couple for myself!) They also seem to stay more moist in bar form, too.

Well, I was going to post a couple more recipes, but this has been long enough! Have a wonderful rest of your Thursday.
Blessings,
Kelly

Thursday, March 29, 2012

Thrifty Thursday #2: Re-purposing Towels


Hello, Friends! Hope you have all been well. We've had some coughs and sniffles around the house, and today Wheels is home from school. He has a chesty cough and had a hard time getting to sleep last night, so we thought it best that he stay home where he can rest and I can make sure that he has plenty of fluids.

It is Thursday again, so it's another post on being thrifty. Before I get started, though, I just wanted to say that some of these posts will require sewing and a sewing machine. (Unless you are extremely talented with hand sewing!) Now, a sewing machine can be quite an investment, especially when you are living paycheck to paycheck. But it is an investment. You don't need a fancy one with lots of bells and whistles, just a basic sewing machine. And it will save you money. You will be able to mend and hem clothing, re-purpose or "up-cycle" clothing (see Thrifty Thursday #1) and make many things for your family and for gifts. Don't have sewing skills? I'm sure you can find someone in your circle of friends and family that will be willing to teach you. That being said, let's move along to Thrifty Thursday #2!!!!

Today is a two-fer! (Wow, really yucking it up with the hyphens today, huh?) The first idea is not my own, but from another blogger that has a lovely blog, complete with music! Over at Blissfully Content she shows us how to make some lovely cleaning cloths. Mine are not that pretty, and I won't horrify you with the results. I was rather slap-dash making mine, but they get the job done and have helped me to cut down on the paper towel usage. That, my friends, is a very nice thing for both the pocket book and the landfill! I even color coded mine according to what color towel I used. Blue for the bathroom and pink for the kitchen. Then I don't need to worry about cross contamination.

So, I made some cleaning cloths ans had some smaller strips of old towel left over. What to do with them? LIGHT BULB! I'll make my own reusable cotton squares for applying my ACV toner! Instead of using cotton balls or those round cotton pads, I now use these terry cotton squares and just toss them into the laundry when I'm done using it. Again, it saves money and the earth. They are easy to make and would make a great project for a beginning sewer, or if you have a little one that wants to see what you are doing and insists on being in your lap. Believe it or not, I snapped some pics for a tutorial! Not that I don't think that y'all can't figure it out on your own, but I have a "technique" that saves time and thread. Here goes!
Cut any banding off of your towel scraps, then cut into the width that you want.
Keep your fabric in strips!


Sew a straight stitch close to the edge of your fabric strip, all the way around.
Now sew stitches across the width of you fabric like pictured above. I sewed my
stitch, then picked up the presser foot WITH OUT cutting the thread, turn your fabric and sew in the other direction, leaving a bit of a margin between your stitching, all the way to the end of your strip.
When you are done sewing, cut between your lines of stitches.


Now you have a lovely pile of reusable cotton squares!
I hope that my "tutorial" wasn't too confusing. I thought that I could do it, but then the words got all screwy in my head and I think I muddled it all up, but the pics should help. Or you can sew them however you want. It's not like I'm going to come to your house and check up on you. (Unless you have some chocolate cookies or something! ;D)

There you go, a two-fer Thrifty Thursday! Let me know if you use these ideas, I'd love to hear from you! And if you have any ideas that you would like to share, let me know. And now, because it's been a long time since the gratuitous pic of my kitty or my kids, another two-fer:

I just love this picture! It loos like Teddy Bear is praying with Merlin. It was so cute that I had to grab my camera. Hope you have a lovely Thursday!
Blessings,
Kelly

Wednesday, March 21, 2012

An Update and Announcement

Hello Friends! Yes, it's been one of those weeks. It seems as if I take one step forward and about 5 back, promptly ending up on my bottom!!! But things are slowly getting straightened out and coming together, as they always do. It is just so hard to forget that the Lord has a light at the end of our tunnel right when we need it, especially when it seems your blindfolded in a bottomless pit of errands, chores and commitments.

Anywho, I cannot get over this weather! It's been nice to get an early start to the yard and garden work, but chances are when the temperatures get back to seasonal, there will be colds running rampant. And I miss those soft, gray days of rain in the Spring as you slowly watch the land come back to life. This feels more like a "WHAM! You want Spring, I'll show you Spring!".

Boy, seems like I'm doing a lot of grumbling..... I'm sorry! Here are the updates. (They make me smile!)

  • St. Patrick's Day was a bit of a non-event at our house this year. I made the typical corned beef and cabbage in the crock pot, but beyond that, nuthin' much special. Although, my Mom and Aunt Jeannie were here to share the dinner. (I'm the only one in the house that really likes it, everyone else had venison!)
  • Sugaring season is over! This is both a blessing and a bummer. A blessing because we had syrup to make and my Dear Hubby was getting tired. A bummer because we didn't get as good of a run as last year, though we had some of last year's left, so we're good.
  • DH and I decided to go in on an order of "Easter Egger" chicks with some friends, and we're expecting them soon. (O.k., my heart just seized up at the thought that I have. nothing. set. up. for. my . new. babies. N.o.t.h.i.n.g.) So the Light Brahmas are out this year, but there's next year!
  • DH and I are currently in negotiations, well really discussion, about going in with some other friends for meat birds. UPDATE: DH came in while I was writing this and I asked him about it. We're going for it!!!!!!
  • I have now watched a total of 3 documentaries on food/nutrition/agriculture/medicine while folding laundry. I've watched "Foodmatters", "Forks Over Knives" and "Ingredients". They all have got me thinking about so many things, more than this post allows for. I need to take some time to write things out (it's the only way I can really process information, writing it out in black and white. Or blue and white, depending on what pen I use ;) Once I've done this, I plan on posting a review/synopsis of sorts. Just a note, these will not be paid endorsements, just my humble opinion.
  • Sunday afternoon was gorgeous! After church Daddy and the boys worked on yard work while Princess and I started her flower seeds. We sat out at the picnic table. enjoying the warm breeze.  Then the boys came up and started their little pizza garden kits they had received from a local gardening store for joining the kid's club. Good thing they were free. There is no way I would have dropped $10 each for these little kits! They had a good time watching the peat pellets expand and planting the seeds. Their kits came with oregano, basil, tomatoes and green peppers. Princess had a kit, too, though hers was and herb garden. All the trays are sitting up on top of the fridge, waiting to germinate!
  • Nearly all of the green peppers that I started about two weeks ago have come up! Hurray!!!!!! I just need to get to my herbs and flowers. I also started some lettuce and spinach on Sunday. I'll have more on that soon.
And now, for that announcement! In lieu of the fact that it has been hectic for me lately, I've decided to focus on at least one weekly post, which I will be calling Thrifty Thursdays. If someone else out there in the blogosphere is using this, I really apologize. Sincerely, truly. But I have some really neat things to share, and I don't feel that I can commit to any more than one post a week at this time. Although, I'm thinking of sharing more things on my face book page, so if you haven't "liked" me there, you can find some more of me and my ramblings. Tomorrow I will be sharing my up cycled outfit from a pair of jeans and a second hand dress, so make sure you visit!

Thank you all, Friends, for stopping buy and taking time to read. I pray you have a lovely night.
Blessings,
Kelly

Thursday, February 2, 2012

[The] Baking Is For the Birds


Now, I realize that some of you are going to think I'm off my rocker. I can't say as though I blame you. I've been doing all sorts of weird things with food lately, (like using them in the bathroom!) but now I am baking for my chickens. {insert eye roll here} This endeavour in the kitchen is not a labor of love, but of necessity.

See that hen up there in the picture. Let me introduce you to Bigfoot. (We have monster truck fans in the house!) Bigfoot and 3 of her flock mates have recently taken up residence in our basement. It seems as though the rest of the flock (that we not-so-lovingly refer to as "the jerks in the coop") were bored during our last cold snap, and decided to peck at some of those lower in the pecking order. We lost 1 hen to this horrible behaviour. My DH had gone out to the coop one evening to check their food and water, and discovered our dead hen. She was laying half in/half out of a nesting box. We had no idea how she had died (at that moment anyway) but she had been pecked. Whether this had occurred before or after the time of death, we were unsure of. (In case you are wondering, we are currently thinking of opening our own Chicken Scene Investigation practice. Kidding! :0) We chalked it up to the inevitable fact that livestock die, and moved on.

The following week I was alarmed to have Teddy Bear come screaming into the house that he saw "meat" on one of the chickens and he was very upset. I ran out to investigate, and discover not 1, but 2 very injured hens. So we set up chicken triage quarters in the basement and have been making the jerks in the coop go out in the run every day. We still ended up with yet another injured girl, but fortunately my DH discovered her early.

I did quite a bit of research on line about why chickens turn to this disgusting behaviour, and there are many. I'm pretty sure that the answer to our riddle is quite simply boredom of being cooped up. (No pun intended) So I looked for suggestions to help this. Most of the articles I read suggested offering the chickens something else to peck, rather than their fellow flock mates. I remembered seeing a Purina Flock Block at our local Tractor Supply Company, and thought that that would be a great idea for the chickens. But it would be a very bad idea for our budget! So I went about finding a recipe for a homemade "flock block". It was not easy, I really had to sift through a lot of links that the search engines brought up, but I finally found 2 different links, both on message forums. Here they are: Alberta Chickens you will have to scroll down a bit to find the recipe. Backyard Chickens I've read quite a few of the other pages from these links and found many other good ideas, and some really bad ones (like the one where a neighbor suggested giving them Styrofoam to peck at or putting Vick's Vaporub on the injured birds.)

This is what I did to make my own "flock block".


And here is my recipe:
2 C. oatmeal
4 C. birdseed
1 C. cornmeal
1/4 C. olive oil
3/4 C. molasses
1/4 C. water
1/2 C, honey
1 small apple, chopped
1 egg, shell crushed and added as well

I mixed the dry ingredients well in a large bowl.

Then I added the wet ingredients, and the apple. I also added half of a peanut butter sandwich that my middle child did not eat at school yesterday for his lunch.
Using a rubber spatula I spread and packed the mix into 2 very well greased loaf pans. (I used Crisco, but lard would be a good choice, too, if you have it.)

I used a bamboo skewer to make a hole for hanging before I put these in a 300* oven for an hour and a half. Then I turned off the oven and let them stay in there for another 30 minutes. I then removed the blocks from the pans and set them on a cooling rack. Unfortunately, one of the blocks broke in half despite my efforts to carefully tip it out of the pan.


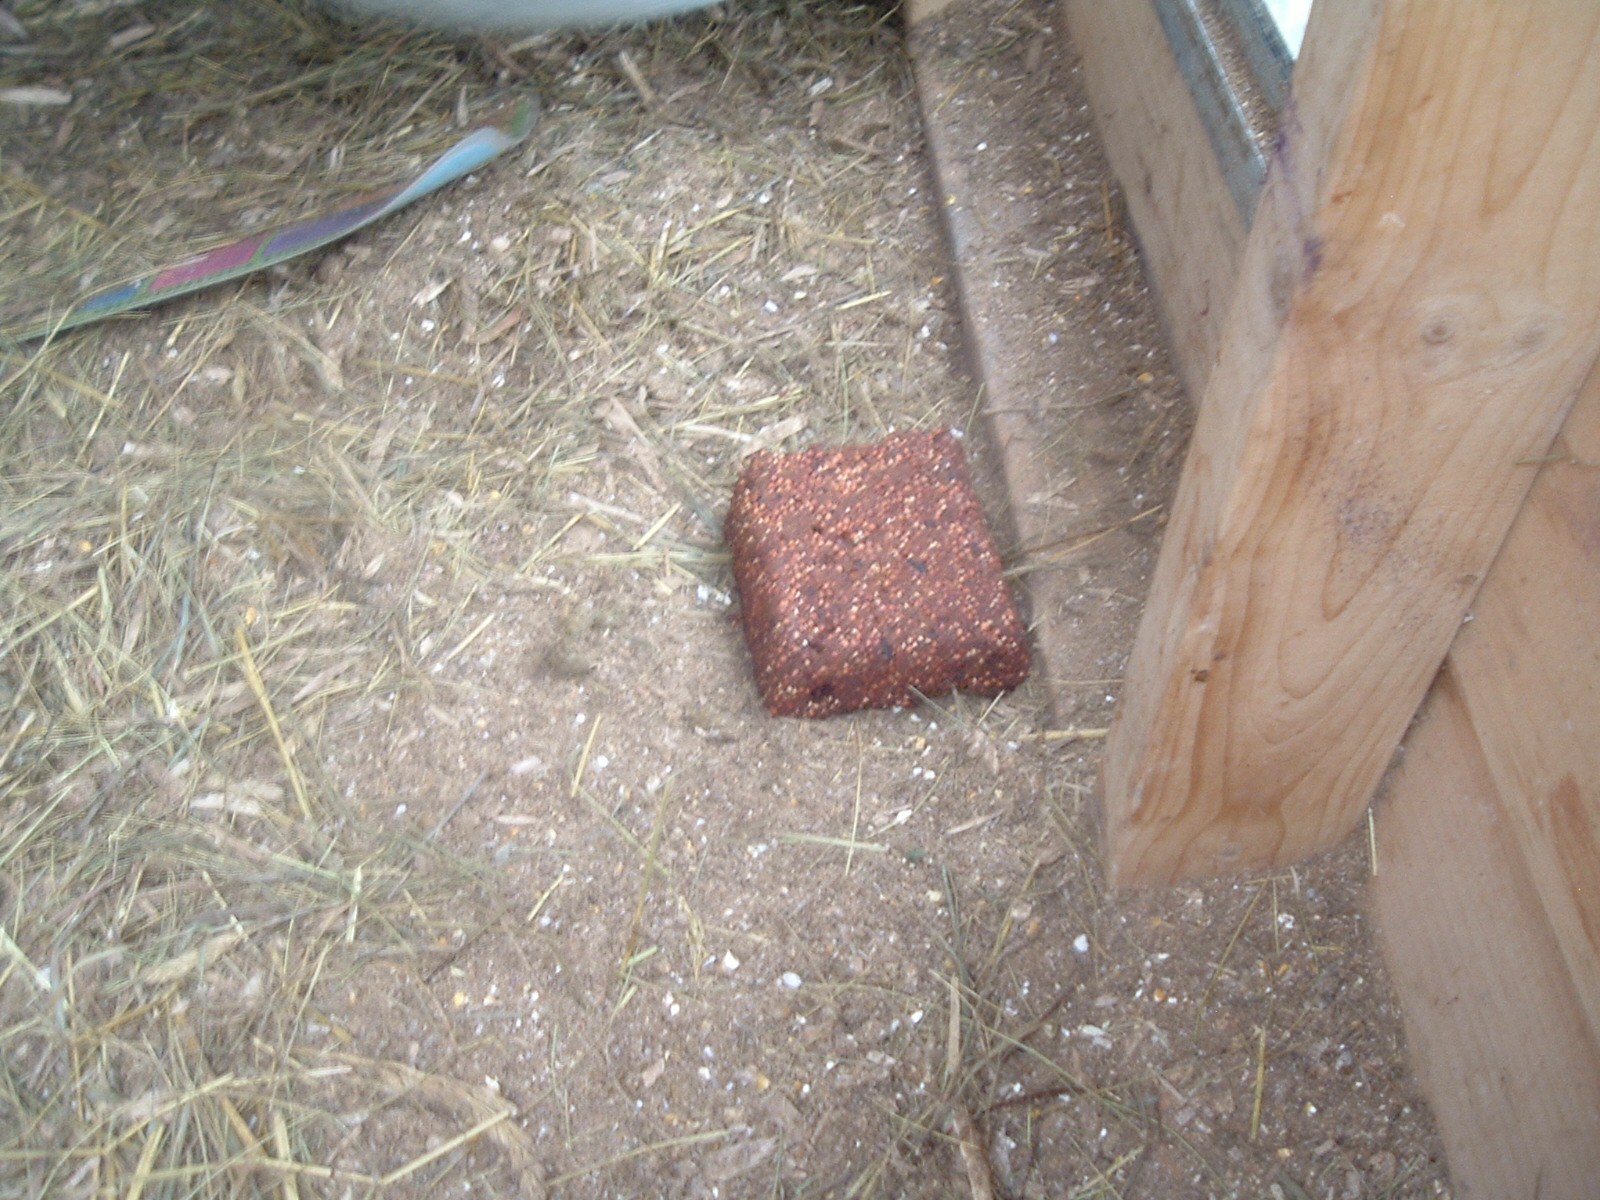
I put the flock blocks back into the oven to dry further and left them in there until the oven was completely cool. Now it's time to give one of these to the jerks in the coop. I put an old shoelace through the hole of the block that was not broken and headed out to the coop with it. It broke in half. {sigh} So I hung up the half with the shoe string and put the other half on the floor of the coop by their feeder.
The Jerks in the Coop.
I couldn't wait around to get pictures of the chickens pecking at the block, but by the next day, it had been completely consumed! They liked it! I kept the next block for if we have another cold snap or (dare I hope!) a snow fall where the chickees would be confined in the coop again. We had snow (for all of 2 days!) earlier this week, so I put half of the second block in the coop. My DH had also built a shelf in the coop to give them some more room. These two measures seem to be helping.


I left out the sugar, salt and reduced the baking soda for the chickee's corn bread.

Above is Star, chowing down. Pictured below is Flower, who for once was quiet!
(Can you guess who named these girls? I mean, really! Star and Flower?)

And now for some more gratuitous photos of our kitty cat Merlin. She was absolutely fuming that I was making those bird brains a treat and won't even bothering to open her a can of tuna!
"Is that for me?"

"What do you mean "NO"?!!!???!!!"


Watching from the top of the basement stairs as the girls in the
basement chow down on corn bread.
"Just leave that cage door open for a minute and I'll get my own chicken treat! MWAH-HA-HA-HA!"**


*I do honestly realize that all of this pecking is a part of regular chicken behavior, as horrible as it is, and not a matter of chicken personalities!
**I really have no idea what Merlin was thinking, but I think it's a pretty safe bet that I'm pretty close!


I'm hoping this is helpful for all of my fellow chicken owners. If you don't own chickens, though, and are fond of feeding wild birds, this would be a great idea to make for them as well. Have a lovely day, Friends!

Blessings,
Kelly