Showing posts with label Sewing. Show all posts

Saturday, December 15, 2012

Thrifty Thursday: Christmas Decor & More!

I know it's Friday! I meant to write this yesterday, but my trip into town lasted much longer than I had planned, so I ran out of time. It's been a while since I have done a "Thrifty Thursday" post, not for lack of things to share though! I just don't know how these ladies that blog daily have the time on top of everything else!

Anywho, I thought I would share a few tips for Christmas decor and my latest sewing project that will help with both our budget and our goal to be better stewards of this planet.
TAA DAAAA! Cloth "paper" towels! I've seen this idea before online, but the last time I saw it was a post that was linked up to Homestead Revival's Barn Hop. So Saturday I used the last of the paper towels, and thought that I hated to have to buy more. We're rather crunched for money this month and I'm cutting as many things from our budget as I can. So I looked at my dear hubby and said "What would you think of using cloth paper towels? I'm pretty sure I have all the material I need to make them." He thought for a moment and, to my surprise and joy, answered, "Sure. Can we keep a roll of regular paper towels for in case the cats get sick, though?" I agreed that that was a good idea, but they have to stay under the kitchen sink. And then I got busy hunting down some terry cloth I was pretty sure I had squirreled away.

Now, the terry cloth is not my choice of colors, but it was what I have, and I have YARDS of it! I decided to make some Christmas ones because I also have about 3 yards of that as well from years ago. I used the tutorial from My Healthy Green Family. I didn't do snaps, nor do I plan to. I just re purposed a small basket to hold them and set it right where the paper towel holder sat on the counter.

 If you are wiping up something that might stain and you want to keep them looking as nice as possible, rinse them in cool water immediately! Our first major spill was pizza sauce, and I figured that I'd have a stained one, but after wiping up the initial mess, I rinsed it out will cool water to finish cleaning up and there was hardly any discoloration. I was also surprised at the whole incident because it was Wheels that spilled the sauce and as he reached for a paper towel and realized it was a cloth one, I thought he'd sputter about it, but he just went with it without a complaint. I think it helps that they are on the same spot as the paper ones! Now I just need to make a wet bag for the dirties!

Here is another thrifty tip; tie your cupboards shut so your hubby and kiddos can't get to the food!!! Just kidding! This is a bow on the cabinet door that I made from some homespun fabric. This was a curtain that I had made years ago and haven't used in a long time, so I just cut a little notch and tore the hems off, then continued to tear strips off of. I've always wanted to do the bows on the cabinet doors, but have always been too cheap thrifty to buy the amount of ribbon I would need. Even if I hadn't re purposed this material and had bought it new, 1 yard would have cost less than a spool of ribbon and have been more than enough to do the job!

All of the cupboards along one wall. I think it looks so pretty and festive!

A bow in the middle of my DIY lighted garland in the living room. Our living room, dining room and kitchen are all open to one another, so using the same material through each "room" helps tie things together.


I used another strip of cloth around my canning jar caddy, which is also my utensil caddy. You can use what you have to add some festive flare to your home, too! The cream colored bowl is the usual bowl I use to hold our fresh fruit in, but I put it on top of the red cake stand to add some zip. And the egg basket is in it's usual place on the counter. I had the food processor on the counter, but decided to move it to clear some of the counter.

This isn't the best picture thanks to the glare, but this is a Christmas hymn/carol subway art. I've seen some on Pinterest, and there are some free printable ones, but I wanted to make my own. I used the Word Art in Microsoft Works on my laptop and added a bit of clip art as well. I printed it on some off white card stock. I made 2 subway art prints for our bedroom with the names of Jesus. They came out beautiful, if I may say so myself. And I made yet one more, in the living room.

The dinner menu board even got a Christmas makeover! This is just some computer paper I have. I was going to do a subway art print with all of the Christmas goodies we like and I make, but I didn't want to spend the time. And believe me, you can waste spend lots of time on this project. Of course, it wasn't until after I made the prints that I thought to look up free fonts in Pinterest. And I found many, but then I hit the mother load! Dafont.com has TONS of free fonts!! I even found fonts that look like the writing in The Hobbit and The Lord of the Ring series!! My geeky heart swelled with joy at the thought of making my own nerd subway art. (I totally admit to being a huge fan of the Tolkien books and movies. I even named one of our chickens Arwen and I dressed up as Frodo this past Halloween for the kids Book Character Parade at school. Never would have figured me for suck a wacko, huh?)

I hope this gives you some ideas!

Many Blessings,
Kelly


Monday, November 26, 2012

Planning for Christmas and Advent

I hope you all had a lovely Thanksgiving, Friends. We had three lovely Thanksgivings, and now I am thankful it is Monday! All joking aside, we did have a wonderful holiday weekend filled with family and food. But I am truly thankful to get back into the swing of things today.

I usually do the weekly shopping on Mondays, but this week is a bit different. So I spent the time I am usually in town on other domestic pursuits. I ran the dishwasher and got a jump start on laundry day, which is tomorrow. Then I got out the sewing machine and made 2 lovely double sided table runners. See:
A beautiful Nativity print. I'm going to use it for a family altar, as soon
as I figure out where I want it!

St. Nicholas on the other side. The runner will be on this side for only a few
days before St. Nicholas Day, Dec. 6.

Advent table runner. I knew I wanted a purple table runner for the dining room
table for Advent, since that is where we have our Advent wreath out. But do you think I
could find a purple Christmas print that did not have snowmen, etc. on it? Of course not!
But I found this lovely homespun fabric in purple, with bit of pink in it, and it has
pink and purple glittery threads running through it. It's absolutely perfect!

The flip side, for Valentine's Day, but I'm thinking I might flip it to this side on the 3rd week
of Advent, when we light the pink candle. We'll see!
I also started a notebook for Advent and Christmas ideas. I cut some pictures from a catalog of craft items because they gave me great ideas on somethings to make with the kids.
This way I don't have to keep the whole catalog, and I can write notes about any changes I'd make or materials I'd use. I plan on sketching some ideas for ornaments, too.

I have been working on my holiday planner, as well.
I had to add a new cover, and I'm working on the inside, too.When I have more done, I'll share.

Thanks to Joybilee Farm blog, I have gotten some new Kindle books on Advent and Christmas for FREE!! So far the ones that I have read have given me some ideas on how to celebrate and focus our family on the true reason for the season: Jesus. I'm still working on whether or not I want to try to do a Jesse Tree again this year, and looking to add other meaningful activities.

I'd love to hear from you and how you celebrate Advent and Christmas. You can leave a comment below, or "like" Homespun Inspirations on facebook.

Hope you have a lovely evening.

Many Blessings,
Kelly

Wednesday, November 14, 2012

Gettin' My Craft On!

Well, I've been meaning to write this post for a while, but in a way I'm glad it's taken me longer because I have more to show you! After 20 years of not having picked up a crochet hook, my Mom refreshed my memory, and I've been hooking my little heart out! To date I have made 4 scarves, 3 Kindle covers, a mug cozy, headband, cell phone cover, dish scrubby, 2 dish cloths, and more. Most of these are Christmas gifts. I am so excited to have relearned this!!
A scarf. This one isn't finished, I have details I want to add to it.

A Christmas set of table runner, dish cloth, dish scrubby and dish soap cozy.

A scarf-ette and headband. I have to add some buttons and make a set of hand warmers
to complete the ensemble.

A Kindle cover and mug cozy. Have to add the button to the mug cozy and I
am trying to think of what else to make to go with these. Any ideas?

Now, I'm not that prolific yet. I can really only do single crochet, sometimes I'll bust out a double if I feel adventurous for a row or 2, but I don't think I've done too bad so far. And I really am excited to be giving these to my loved ones. I usually sew gifts, but I don't have a space dedicated to sewing, so by the time I get every thing dragged out and situated, nearly half of my time is used up. I truly have to plan my sewing time. With crocheting, however, I can do it whenever, where ever. So I'm ahead on my Christmas gifts this year, and that is awesome!
I did some sewing back it late October, including this Thanksgiving table runner.
That's our one lonely pumpkin from our garden this year!

A Kindle cover for my Mom.

These are fleece hand warmer mitts that I made a friend for her birthday. I made little rice bags
that she can microwave and then place in the pockets of the mitts.

Some double sided little table runners for the end tables in our living room.

A double sided table runner for the coffee table.
Today I'm hoping to look through my craft items because I'd like to start making some ornaments with the kiddos to give as Christmas presents. I've got some cute ideas, and I'll share those soon. I'd really like to have a crafting night or 2 every week with them, but we'll see how it goes. Princess will be all for it, but I don't know about my boys!

That's all for now. I have house work and errands to get to. Have a wonderful day friends!
Many Blessings,
Kelly

Wednesday, April 18, 2012

Reusable Shopping Bag Fun #1

I think I have a problem. It's name is Pinterest! Oh how I love it and hate it at the same time. I could spend hours (and o.k., I have!) perusing the boards, pinning my little heart out. Learning how to grow potatoes in landscaping fabric bags, make a fairy garden and whip up a cocktail dress from a reusable shopping bag! Alright, maybe not a cocktail dress (I'm not the cocktail type, more of a maple kefir or herbal tea type. No fancy duds required.), but many cute things! And, I have made some! I have seam ripped, cut and sewn 2 reusable shopping bags into some very cute and practical things. Some of them need to wait for their unveiling tomorrow, but for now I give you........


A purse set! Complete with wallet, change purse and another little pouch. This is from just one shopping bag. And I still have a panel of the bag left, which I'm going to use to make a Bible cover. Here is what the shopping bag looked like before:


This bag is just so beautiful, I wasn't sure what I wanted to do with it! After my Mom saw my first project, she brought this up to me. (And then proceeded to buy me 2 more shopping bags from T.J. Maxx! Gotta love your Mom!) I considered making a lunch bag/snack bag set for myself, but I already have a lunch bag. And this is just too pretty for occasional use. So, I made the purse set.

I used the seam ripper to take the binding and handles off of the bag because I planned on using them. You can just cut it apart, though if you want. The shopping bags are really easy to work with in terms of the fact that you don't need to hem for fear of fraying. Depending on what you are making, you don't need to hem. I chose to use the binding for a neater look, and I think it made it easier to sew. The only thing I would recommend is to use a needle designed for sewing heavy materials.

So, there you have it! My newest obsession, via Pinterest: making super cute things out of reusable shopping bags. And I'm just getting started!

Blessings,
Kelly

Thursday, March 29, 2012

Thrifty Thursday #2: Re-purposing Towels


Hello, Friends! Hope you have all been well. We've had some coughs and sniffles around the house, and today Wheels is home from school. He has a chesty cough and had a hard time getting to sleep last night, so we thought it best that he stay home where he can rest and I can make sure that he has plenty of fluids.

It is Thursday again, so it's another post on being thrifty. Before I get started, though, I just wanted to say that some of these posts will require sewing and a sewing machine. (Unless you are extremely talented with hand sewing!) Now, a sewing machine can be quite an investment, especially when you are living paycheck to paycheck. But it is an investment. You don't need a fancy one with lots of bells and whistles, just a basic sewing machine. And it will save you money. You will be able to mend and hem clothing, re-purpose or "up-cycle" clothing (see Thrifty Thursday #1) and make many things for your family and for gifts. Don't have sewing skills? I'm sure you can find someone in your circle of friends and family that will be willing to teach you. That being said, let's move along to Thrifty Thursday #2!!!!

Today is a two-fer! (Wow, really yucking it up with the hyphens today, huh?) The first idea is not my own, but from another blogger that has a lovely blog, complete with music! Over at Blissfully Content she shows us how to make some lovely cleaning cloths. Mine are not that pretty, and I won't horrify you with the results. I was rather slap-dash making mine, but they get the job done and have helped me to cut down on the paper towel usage. That, my friends, is a very nice thing for both the pocket book and the landfill! I even color coded mine according to what color towel I used. Blue for the bathroom and pink for the kitchen. Then I don't need to worry about cross contamination.

So, I made some cleaning cloths ans had some smaller strips of old towel left over. What to do with them? LIGHT BULB! I'll make my own reusable cotton squares for applying my ACV toner! Instead of using cotton balls or those round cotton pads, I now use these terry cotton squares and just toss them into the laundry when I'm done using it. Again, it saves money and the earth. They are easy to make and would make a great project for a beginning sewer, or if you have a little one that wants to see what you are doing and insists on being in your lap. Believe it or not, I snapped some pics for a tutorial! Not that I don't think that y'all can't figure it out on your own, but I have a "technique" that saves time and thread. Here goes!
Cut any banding off of your towel scraps, then cut into the width that you want.
Keep your fabric in strips!


Sew a straight stitch close to the edge of your fabric strip, all the way around.
Now sew stitches across the width of you fabric like pictured above. I sewed my
stitch, then picked up the presser foot WITH OUT cutting the thread, turn your fabric and sew in the other direction, leaving a bit of a margin between your stitching, all the way to the end of your strip.
When you are done sewing, cut between your lines of stitches.


Now you have a lovely pile of reusable cotton squares!
I hope that my "tutorial" wasn't too confusing. I thought that I could do it, but then the words got all screwy in my head and I think I muddled it all up, but the pics should help. Or you can sew them however you want. It's not like I'm going to come to your house and check up on you. (Unless you have some chocolate cookies or something! ;D)

There you go, a two-fer Thrifty Thursday! Let me know if you use these ideas, I'd love to hear from you! And if you have any ideas that you would like to share, let me know. And now, because it's been a long time since the gratuitous pic of my kitty or my kids, another two-fer:

I just love this picture! It loos like Teddy Bear is praying with Merlin. It was so cute that I had to grab my camera. Hope you have a lovely Thursday!
Blessings,
Kelly

Thursday, March 22, 2012

Thrify Thursday #1: The Denim Skirt

Now, before I start, I have to say that my original thought for this post was about sewing a denim skirt from a pair of jeans. But then I kept thinking. Dangerous, right? My thought is that a flattering, appropriate length denim skirt is a very wise investment. (Even if you were to pay full price. Oh, did I type that out loud?!) But seriously, it truly is. And here is why I think so.

  • A denim skirt is like a pair of jeans. They go with anything. No matter what color or print.
  • They are all season. Yes, even winter. Think of hosiery or Capri leggings underneath.
  • They can be dressed up or played down. Very versatile.
  • They are a bit more rugged than a silky, lighter weight fabric. I'm thinking toddlers or messy eaters. (including the one wearing the skirt!)
  • The fact that they go with anything means you can dress as quickly for church on any given Sunday in which you sleep in too late or have the "I Have Nothing To Wear" dilemma. (In which you really do have lots of things to wear, but you are bloated, grouchy or just don't feel like having to deal with skin colored undergarments that slim!)
Also,  a denim skirt may feel more comfortable for those who are trying to get into the skirt wearing habit. I know that I have sisters in the Lord that feel led to wear skirts exclusively. I am not one of them. I do want to start wearing them more often, at least on Sundays for church. I'm not going to go in depth of this issue, as it can be one of the hot button issues for some. Suffice it to say, in my humble opinion, do what you feel led by the Lord to do. I wear pants 95% of the time, and I don't feel that wearing a skirt makes you more godly.

Now, onto making a skirt from a pair of jeans. This was one of those things I saw on another blog where they had made one. I thought to myself that that was really cool, maybe someday. Someday came sooner than I thought when going through my......u-hum.....large pile of mending and hemming to get to my sewing machine. I found a pair of jeans that I had given up on mending, but was keeping for the material. LIGHT BULB!!!! I had the pair of jeans to make a skirt. And I had material that I had purchased to make a skirt last summer, but never got to. (Shocking, right?) I got on line so I could click the link for the tutorial I had saved. After a couple of hours, (I had to get the kids off the bus, make and eat dinner in the middle of all of this!) I had a beautiful skirt! I'm very proud of it, especially since I've never sewn a skirt before, and with the exception of the tutorial post, had no help.(In other words, I didn't bug my Mom for her help, didn't even call her!)
I know, the hem in the back is a tad longer than the front.

The appliques I made using the denim and fabric scraps. They really make the skirt!

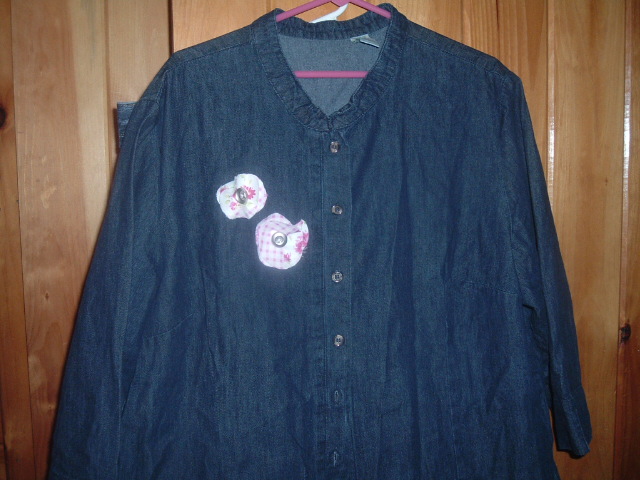
Then, inspiration really struck! Languishing in my closet was a denim shirt dress that I bought at the thrift store many moons ago. It was brand new, never worn or washed and I had never worn it because it just didn't feel "right". So, I hacked off  the bottom, let out the darts in the back to add some of the flowered fabric and added some fabric flowers. Voila!
I need to change out the buttons to some silver ones. One of those "I have to
sit down but also need to do something productive" projects.

The added fabric in the back. It makes it kind of swingy. (Oh alright! It also made it fit a bit better!)

The flowers.
So, that is my up cycled outfit!!!! I love it because I can wear a blouse or a t-shirt with this outfit. And, I don't really have to wear the jacket with it either. And I finally have a skirt I can wear to work at the school and not feel too fancy in.

Now, I'm not giving a tutorial, I think we can all agree I'm not that good at it, at least not on projects of this magnitude. But I will give you the link to the tutorial that I used. She used 2 pairs of jeans so that the skirt was completely denim, whereas I used fabric to fill in the gap.
~Jean Skirt Tutorial from Stand By Faith

Thank you so much for stopping by today! If you have any questions or comments, I'd love to hear from you. Have a great rest of your Thursday.
Blessings,
Kelly

Wednesday, March 21, 2012

An Update and Announcement

Hello Friends! Yes, it's been one of those weeks. It seems as if I take one step forward and about 5 back, promptly ending up on my bottom!!! But things are slowly getting straightened out and coming together, as they always do. It is just so hard to forget that the Lord has a light at the end of our tunnel right when we need it, especially when it seems your blindfolded in a bottomless pit of errands, chores and commitments.

Anywho, I cannot get over this weather! It's been nice to get an early start to the yard and garden work, but chances are when the temperatures get back to seasonal, there will be colds running rampant. And I miss those soft, gray days of rain in the Spring as you slowly watch the land come back to life. This feels more like a "WHAM! You want Spring, I'll show you Spring!".

Boy, seems like I'm doing a lot of grumbling..... I'm sorry! Here are the updates. (They make me smile!)

  • St. Patrick's Day was a bit of a non-event at our house this year. I made the typical corned beef and cabbage in the crock pot, but beyond that, nuthin' much special. Although, my Mom and Aunt Jeannie were here to share the dinner. (I'm the only one in the house that really likes it, everyone else had venison!)
  • Sugaring season is over! This is both a blessing and a bummer. A blessing because we had syrup to make and my Dear Hubby was getting tired. A bummer because we didn't get as good of a run as last year, though we had some of last year's left, so we're good.
  • DH and I decided to go in on an order of "Easter Egger" chicks with some friends, and we're expecting them soon. (O.k., my heart just seized up at the thought that I have. nothing. set. up. for. my . new. babies. N.o.t.h.i.n.g.) So the Light Brahmas are out this year, but there's next year!
  • DH and I are currently in negotiations, well really discussion, about going in with some other friends for meat birds. UPDATE: DH came in while I was writing this and I asked him about it. We're going for it!!!!!!
  • I have now watched a total of 3 documentaries on food/nutrition/agriculture/medicine while folding laundry. I've watched "Foodmatters", "Forks Over Knives" and "Ingredients". They all have got me thinking about so many things, more than this post allows for. I need to take some time to write things out (it's the only way I can really process information, writing it out in black and white. Or blue and white, depending on what pen I use ;) Once I've done this, I plan on posting a review/synopsis of sorts. Just a note, these will not be paid endorsements, just my humble opinion.
  • Sunday afternoon was gorgeous! After church Daddy and the boys worked on yard work while Princess and I started her flower seeds. We sat out at the picnic table. enjoying the warm breeze.  Then the boys came up and started their little pizza garden kits they had received from a local gardening store for joining the kid's club. Good thing they were free. There is no way I would have dropped $10 each for these little kits! They had a good time watching the peat pellets expand and planting the seeds. Their kits came with oregano, basil, tomatoes and green peppers. Princess had a kit, too, though hers was and herb garden. All the trays are sitting up on top of the fridge, waiting to germinate!
  • Nearly all of the green peppers that I started about two weeks ago have come up! Hurray!!!!!! I just need to get to my herbs and flowers. I also started some lettuce and spinach on Sunday. I'll have more on that soon.
And now, for that announcement! In lieu of the fact that it has been hectic for me lately, I've decided to focus on at least one weekly post, which I will be calling Thrifty Thursdays. If someone else out there in the blogosphere is using this, I really apologize. Sincerely, truly. But I have some really neat things to share, and I don't feel that I can commit to any more than one post a week at this time. Although, I'm thinking of sharing more things on my face book page, so if you haven't "liked" me there, you can find some more of me and my ramblings. Tomorrow I will be sharing my up cycled outfit from a pair of jeans and a second hand dress, so make sure you visit!

Thank you all, Friends, for stopping buy and taking time to read. I pray you have a lovely night.
Blessings,
Kelly

Wednesday, February 22, 2012

Double Sided Table Runners

The solid green side can be for Mardi Gras, St. Patrick's Day, Christmas, or any day you want to use green! The shamrocks are for St. Patrick's day. You can't really tell in this pic, but the green has a gold sparkle to it, while the shamrock side has a silver sparkle sheen.

The solid purple side is for Lent, the print is for Easter. I absolutely adore the Easter print, which was the only Easter print that I could find that wasn't completely secular. This has "He Is Risen" and "Rejoice" printed on it, so it is truly a print worthy of the occasion!
Yesterday I mentioned that I was able to do some sewing. I had wanted to make a table runner for Lent. In an article I had read about sharing Lent with your children, the author suggested using a purple table cloth for the season. Table cloths + my family doesn't work unless it's vinyl, which I'm not sure if I could find a purple vinyl table cloth, unless it had bunnies on it. So, when I had purchased the fabric for the chicken saddles I saw the shade of purple that I really liked. (And yes, the chicken saddles now match my Lenten linens.)

 Anywhoo, the kids went with my mother in law yesterday afternoon, so I pulled out the iron and sewing machine. I knew exactly how I wanted my table runner and shelf scarves to look. I had purchased a sort of gold shade of thread and wanted to use one of the fancy stitches that my machine can do. I wanted to iron the hems in and pin them so all was straight and neat. But then I looked at the clock and felt a twinge in my back and thought how in the world was I really going to do this? (And along with my Martha tendencies, I am also very instant gratification oriented. Sound like fun, don't I? Wanna come over and craft? ;0)

I looked at my fabrics and decided that the easiest and neatest way to make these (sorry, I forgot to mention that I wanted to make the green table runner for Mardi Gras, too!) was make them double sided. You see, I'm also rather cheap frugal when it comes to craft supplies, preferring to wait for sales, coupons and (the best!!!!) clearance. I had only bought 1/2 a yard of the shamrock print and saved 1/2 yard of the purple material for my table runner. I had plenty of the green sparkle because that had been on clearance (yay!!!) for like a dollar a yard years ago before I even had children. (I know, yada, yada, yada, get to the point rambling woman that has conversations with her cat) With only 4 pieces of fabric, each 1/2 yard, I ended up with two table runners for about 6 holidays/seasons.

Reasons to make double sided table runners:
  • it saves time- you don't have to sew 2 runners for 2 different holidays/seasons/occasions
  • it saves money- you don't have to buy more than you absolutely need of a costly fabric or buy another piece of fabric to back it
  • it saves space- you'll only have to store half the table runners that you need
Now, I'm not going to give any sort of tutorial here. I think we can all agree that I'm not that good at it! And besides, it rather easy. Sew your fabric faces/right sides together, leaving an opening so that you can turn it right side out. Once you have it turned right side out, iron it so it is nice and flat, the seems pressed out neatly. Now, keeping a consistent seam allowance, sew around the edge of the runner all the way around. Voila! You've got a table runner!


These are the two shelf scarves that I made. The one with the fancy stitching on the right is on the secretary that is on our family faith wall. The one on the left is on a little shelf in my bedroom where I've made a little prayer corner. Unfortunately the fancy stitching made the fabric pucker, so I was only able to do it on the two sides of the shelf scarf, and not at all on my table runner. :(

Well, it's time to turn in for the evening. I'll be sharing more about our family faith wall and preparing for Lent. Have a lovely evening, Friends.
Blessings,
Kelly

Tuesday, February 21, 2012

Pancake Tuesday, Mardi Gras and/or Shrove Tuesday

Our morning started with chocolate chip pancakes.

The kiddos and I sat down to these lovelies and added some butter and, of course, Daddy's homemade syrup.

After chores we had craft time. We made crowns and masks for Mardi Gras.


These are the boys' crowns.

Mimi got in on the action when she dropped of our King's Cake that we're having for dessert. I'll share pics of that later, she did a beautiful job of it!

This is a cat toy for Miss Merlin. I did some sewing in the afternoon. I'll show the fruits of that labor in a very near future post. Prissy cat didn't even care for her toy. It's stuffed with our last sprig of homegrown catnip. I put pretty, tantalizing ribbons on it. Humph!

This was our table for dinner. I got the coins and center piece at the dollar store. The table runner was one of the fruits of labor mentioned above.

I also took some time to work on our family faith wall for Lent. I got the Alleluia out so that we can bury it tomorrow, for Ash Wednesday. I'll post more about our family faith wall and preparing for Lent.
Well, that's our day! I'm off to have some King's Cake with my family. Have a lovely evening, Friends.
Blessings,
Kelly